
Before installing the KIT2 driver, it is recommended to first install the MPLAB IDE software. This ensures that all necessary tools and drivers are properly set up for smooth operation with the KIT2 programmer.
1. Install the KIT2 DriverOnce the KIT2 is connected to your computer via USB, a prompt will appear saying "New hardware found." You should choose the option to automatically install the driver. The system will then search for the appropriate driver and complete the installation process. Once done, the KIT2 will be ready for use.
2. Connect the KIT2 ProgrammerYou can connect the KIT2 to the target board, although it’s not required during initial setup. Follow these steps:
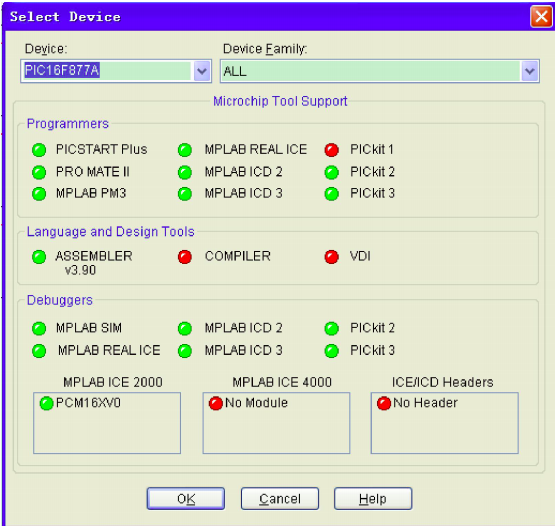
1. Select the target microcontroller: Go to Configure > Select Device, then click OK.
2. Connect the KIT2: Navigate to Programmer > Select Programmer > Pickit 2.
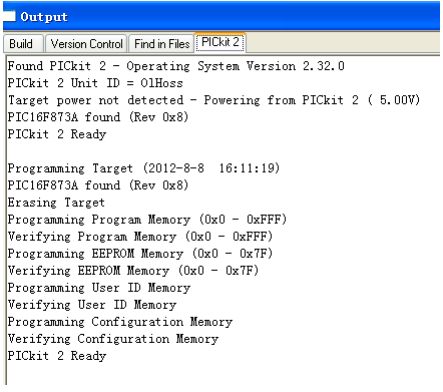
3. Download the operating system: Go to Programmer > Download OS. Wait about 10 seconds until the system completes the download.
When the target board is connected, you should see a normal status message. If no board is connected, a different prompt will appear.
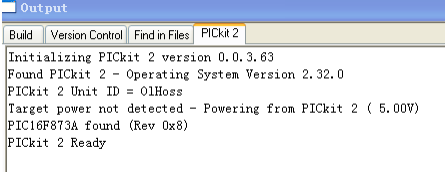

Once the board is connected, click Programmer > Connect to verify the connection.
Note: To disconnect safely, go to Programmer > Select Programmer > None, then unplug the KIT2 from the USB port.
3. Power Supply SetupThe KIT2 can power the target board through its USB connection, but keep in mind that the voltage comes from the computer’s USB port. Since most USB ports provide limited current, if your target board requires high current, it is advisable to use an external power supply instead. For low-current boards, the KIT2 can provide sufficient power.
To enable this feature, follow these steps:
Go to Programmer > Settings.
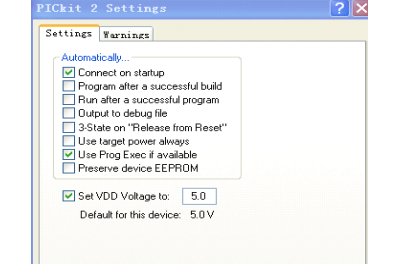
Check both options and click OK.
At this point, the KIT2 should be online. If a prompt appears during connection, try removing the USB cable, wait for a beep, and reinsert it. Then click Programmer > Connect again.
To avoid issues, make sure to select None for the programmer or debugger before unplugging the USB cable. This can be done by going to Programmer > Select Programmer > None, or Debugger > Select Tool > None.
4. Steps to Burn Code Using KIT21. Select the microcontroller: Go to Configure > Select Device.
2. Connect the programmer: Programmer > Select Programmer > Pickit 2.
3. Import the hex file: File > Import (select the file you want to burn).
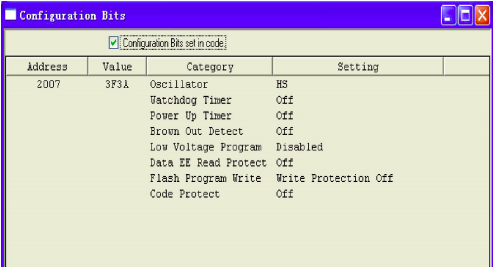
4. Set configuration bits: Configure > Configuration Bit.

5. Start the programming process: Programmer > Program. A success message should appear once completed.
1. Select the microcontroller: Configure > Select Device.
2. Connect the debugger: Debugger > Select Tools > Pickit 2.
3. Configure the device settings: Configure > Configuration Bit (as previously set).
4. Open your project file: Project > Open.
5. Compile the source code.
6. Click Debugger > Program. Note: You must download the program after each compilation. You can also configure the software to auto-download after every build.
Once everything is set, you can run the program, step through the code, or use other debugging features as needed.
Bang King 20000 Puffs Mesh Coil Eshisha Disposable Vaporizer


Bang King 20000 Puffs Mesh coil Eshisha Disposable Vaporizer
Shenzhen Yingyuan Technology Co.,ltd , https://www.yingyuanvape.com