
This project features a high-frequency switching transistor, the BD139, which is known for its strong performance and ability to enhance signal output. As the saying goes, "the greater the power, the greater the responsibility." This means that using such a device requires caution. It should not be placed near sensitive electronics like hard drives or other delicate components, as it can create high-frequency interference that might damage your equipment. Always take safety precautions when working with transformers, and use insulated bushings to prevent electric shocks. Avoid using power adapters or batteries in this setup.
Additionally, this wireless LED light is a great educational tool for demonstrating electromagnetic induction principles. The materials required are simple and easy to find. Here’s what you’ll need:
- 2 x 2-turn coils
- 33k ohm resistor
- 100nF capacitor (also labeled as 104)
- 100μH inductor
- One LED (red, orange, or red patch works best)
- BD139 transistor (or similar)
- Bridge rectifier (can be made using 4x 1N4148 diodes)
- Perforated board (3x3cm)
- Wires, solder, and a power source (6-12V)
Step 1: Gathering Materials


Coils can be made from old magnetic rings, while transistors, resistors, and capacitors are commonly available at local electronics stores. Inductors can be either salvaged from old circuit boards or wound around a ferrite core. A small bridge rectifier can also be built if needed.
Step 2: Building the Mini Bridge Rectifier
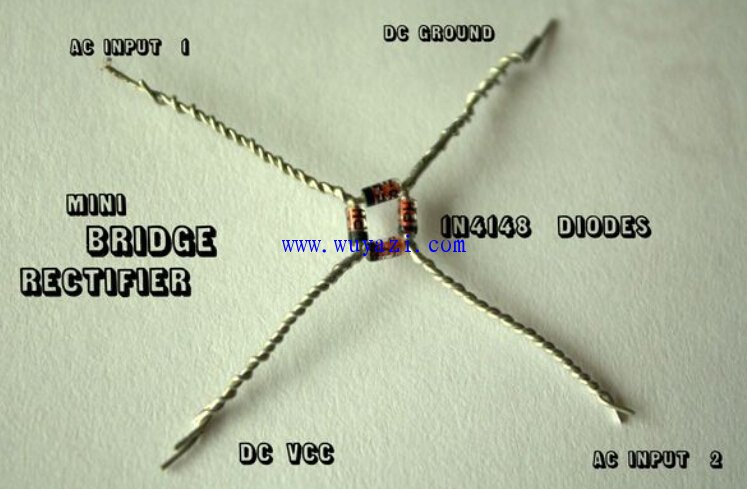
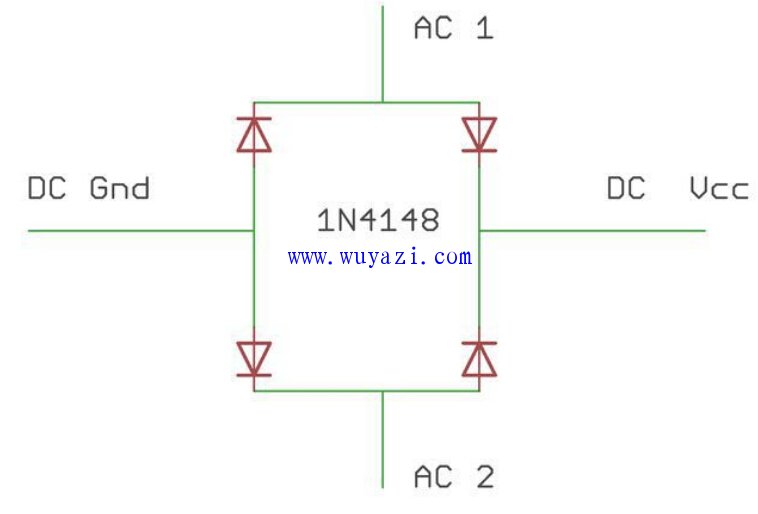
To build the rectifier, you’ll need four 1N4148 diodes. Connect them according to the schematic, ensuring correct polarity (black line indicates negative). Solder the connections carefully to avoid any short circuits.
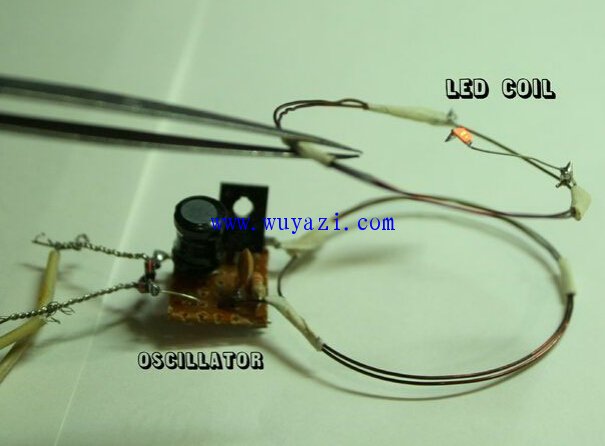
Step 3: Soldering the Circuit

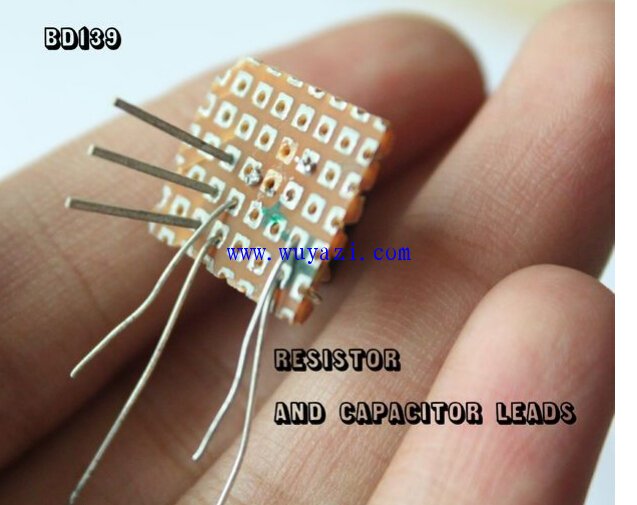
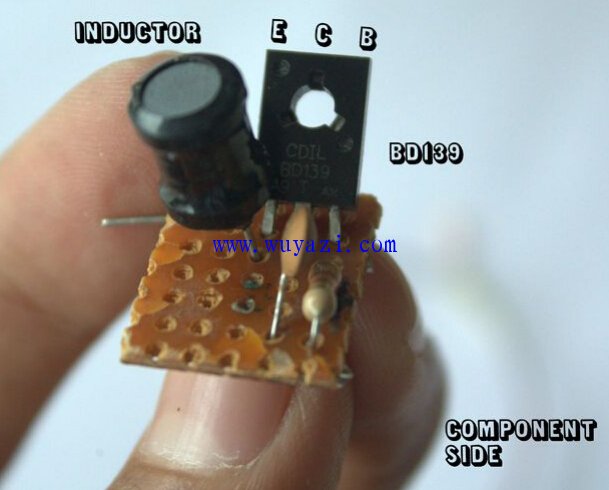
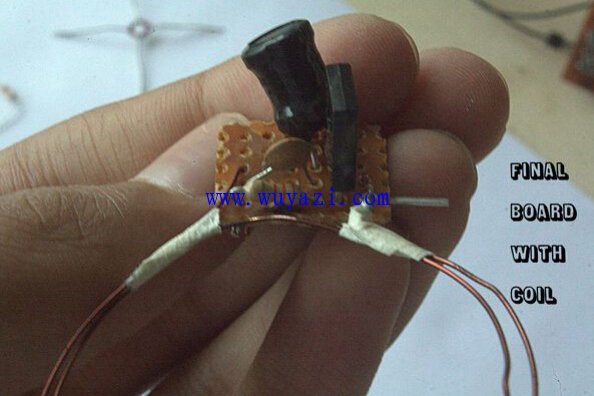
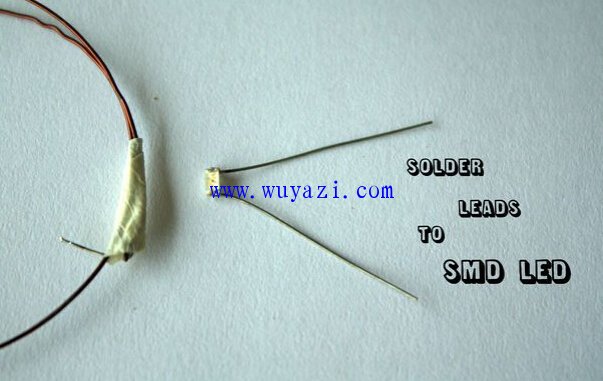

Follow the schematic to assemble the circuit on a perforated board or breadboard. Be careful when soldering the coil to maintain its shape and alignment. For SMD LEDs, attach leads to the pads, while through-hole LEDs can be directly connected to the coil without worrying about polarity.
Step 4: Understanding the Principle
This project demonstrates mutual induction. The transmitter coil generates a magnetic field, which induces a current in the secondary coil connected to the LED, creating an electromagnetic field that powers the LED wirelessly.
Step 5: Testing and Troubleshooting
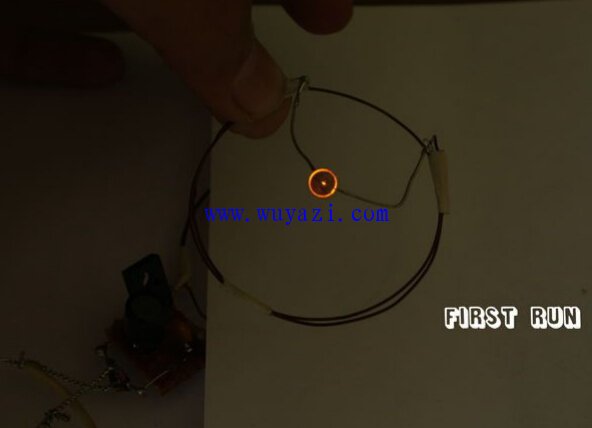

Testing the circuit involves connecting the oscillator to a DC power supply (6-12V), placing the drive coil on a stable surface, and holding the LED coil parallel to it. Bring the LED coil close to the oscillating one without touching. You may notice the transistor warming slightly, but this is normal. If everything works, the LED should light up.
If the LED doesn’t light up, check the following:
- Ensure all solder joints are secure and clean.
- Avoid poor contact between components.
- Make sure the coil is perfectly round and aligned.
- Adjust the distance between the two coils for optimal performance.
- If the coil is misaligned, the LED brightness may decrease.
With a little patience and attention to detail, this project is a fun and educational way to explore the basics of wireless power transfer and electromagnetic induction.
Lead Acid Battery categories are described as follows:
I. Basic overview
Definition: A lead-acid battery is a traditional chemical battery that uses lead as a negative electrode and sulfuric acid as an electrolyte. It provides power by converting chemical energy into electrical energy and storing the electrical energy back into chemical energy during the charging process.
Development history: The history of lead-acid batteries can be traced back to the mid-19th century, invented and gradually improved by Castro and Plante and others. With the continuous progress of technology, lead-acid batteries have been significantly improved in terms of performance, safety, and maintenance convenience.
Two, the main characteristics
Low cost: The raw materials of lead-acid batteries are abundant and cheap, making their overall cost relatively low.
Mature technology: After long-term development and application, the technology of lead-acid batteries has been very mature, and the production process is stable and reliable.
Easy maintenance: Compared with other types of batteries, the maintenance of lead-acid batteries is relatively simple, and users can perform simple maintenance by adding water and adding acid.
Long life: Under normal use and maintenance conditions, the life of lead-acid batteries is relatively long, and can meet the requirements of various application scenarios.
High safety: The structure of the lead-acid battery is simple and stable, and it is not easy to explode or burn.
3. Application fields
Car start: the lead-acid battery is one of the core components of the car start system, which provides the electric energy required for the engine to start.
Power tools: In the field of power tools, lead-acid batteries are also widely used to provide power support for tools such as drills and chainsaws.
Electric bicycles: Some electric bicycles use lead-acid batteries as a power source to provide lasting endurance for the vehicle.
Home energy storage systems: With the popularity of home energy storage systems, lead-acid batteries are also used to store electricity generated by renewable energy sources such as solar energy.
Solar system 12V, Uninterrupted Power Supply with battery,12V lead acid battery
Foshan Keylewatt Technology Co., LTD , https://www.klwenergy.com